This blog is all about Food. Real Food. Food that Nourishes, Heart and Soul.

Real Ingredients, Organic and Locally sourced whenever and where ever possible, shared with love.

No packages, no ingredients that are impossible to pronounce.

Real, honest food, from my kitchen to yours. Enjoy!

Friday 29 March 2013

Creamy Almond Coconut Easter Eggs


So, with Easter upon us, I decided to make a healthier Easter treat for Jim and the boys. I found this idea online,  made a few tweaks to suit the ingredients I had on hand, and came up with this recipe. Which tastes pretty darn good. I had such high hopes! Everything was going along great, until the dipping part. The chocolate chips, when melted, were pretty thick, so I used a bit of coconut oil to thin the mixture. But, alas, when I set them on the parchment, it pooled all around the edges, and didn't look very pretty. So I set them on a wire cooling rack instead, and the extra chocolate could just, in theory, drip away. But, as it cooled, they stuck soundly to the wire rack, and, when cold,  peeled most of the chocolate off the bottoms of the eggs. I had to patch the bottoms with more chocolate, which was messy, and by this time, not fun anymore! I ended up having to drizzle the last of the melted chocolate over the tops to disguise the drips from the patch job.  On the bright side, Jim says they are awesome, so maybe someone out there in internet land can figure out a way to make coating them easier! Leave a comment if you do, I would love to give them another go!

Creamy Almond Coconut Easter Eggs
Filling: 
½ cup coconut sugar, whizzed in blender to a fine powder (see picture below)
1 cup smooth organic almond butter (or other nut butter of choice)
1 200g package of organic coconut cream (soften bag in a bowl of warm water to make it workable)
½ cup room temp (slightly soft) coconut oil
2 tsp vanilla

Chocolate coating:
1 283g bag of Enjoy Life Chocolate chips
2 Tbsp coconut oil

In the bowl of a stand mixer or a large bowl with a hand mixer,  mix all of the filling ingredients
Mix well in blender with paddle attachment until you have a smooth creamy batter.

***Optional step:  For Chocolate variation, at this point add:
egg shaped filling
6 tbsp raw cacao powder ( I took out half of the batter, and added 3 tbsp to one half of the recipe so we would have 2 flavours)

Chill for 1 hr to firm up the batter.
Using a 1 tbsp measuring spoon, scoop out the chilled batter onto a pan covered in parchment paper or waxed paper. Gently encourage each tbsp of batter into an egg shape.  THIS IS A MESSY JOB!!! The dough does start getting mucky when it starts to warm up, so you will need to work quickly. Don’t worry a whole lot about the overall texture of the egg, as the chocolate coating will cover it anyway, you are working towards the shape.
Place egg shapes in freezer to chill again for another ½ hour or so.
When the eggs have firmed up, melt your chocolate chips and coconut oil together in a double boiler or heat proof bowl over gently boiling water. As soon as it is melted, dip your eggs, using a fork or other convenient dipping tool. Place dipped eggs on a wire rack and refrigerate again until the chocolate coating has hardened.
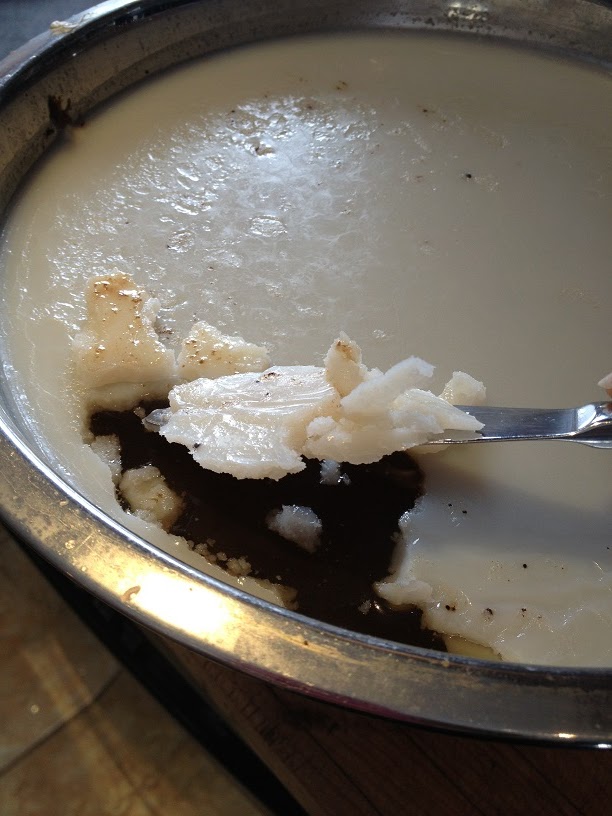
*** Now here is where I ran into some trouble. When I tried to take the cooled eggs off of the wire racks, most of them stuck, and ended up removing most of the chocolate from the bottoms. I used a spoon and more chocolate to patch them up, and chilled them again , upside down to firm up the base.
When completely  cool, turn eggs over and drizzle with remaining chocolate to decorate the tops and disguise any drips from patching up the bottoms.
Dipped Eggs
These will need to be stored in the refrigerator or freezer, as they will melt somewhat at room temperature. This made about 35 tbsp sized eggs.
So sad, the bottoms
peeled right off :(

Action shot!
This shows the difference
between the coconut sugar
as is, and then after it has been
blended, you want a nice fine
powder.


After much to-do, they look kinda pretty!

Grass Fed Beef Burgers Without the Bun :)


When you take most grains out of your diet, you may often wonder if you will ever be able to eat some of your favourite foods again. Enter the humble lettuce leaf…we have used them as wraps, sandwich bread, Sloppy Joe vessels, and burger buns.  After the initial weirdness wears off, you won’t miss the bread at all. Romaine and green leaf lettuce seem to work the best, you need a lettuce with a bit of  body to it. Just be prepared for some mess, they are not the neatest things to eat!!

A lot of home made burgers have bread crumbs in them, I find them to be way juicer without. Give it a try! I don't think you'll miss them anymore than you miss the buns!

Grass Fed Beef Burgers

1 pastured egg
1 tsp grainy organic mustard
1 clove organic garlic, minced
2 tsp dried organic oregano
¾ tsp Herbamare or other unrefined sea salt

Mix all ingredients together, I find it easiest to use my hands to get everything well incorporated. Divide into 4 even pieces and shape into evenly thick patties. Cook over medium heat on a preheated bbq grill or over medium high heat in a nice hot cast iron pan with a bit of coconut oil. Cook on the first side for 6 minutes, and then flip and cook for another 3.
Serve hot between lettuce leaves, topped with your choice of toppings. We topped it with a nice slice of raw cheddar,  some sautéed organic mushrooms and onions and a dollop of the organic grainy mustard.

Wednesday 27 March 2013

Grain Free Cauliflower Pizza Dough


I have made many attempts at grain free pizza. And they all, while being pretty tasty, failed in the pizza–like crust department. The grain free ones were too dry, the cauliflower ones too wet.  We had yet to have one that could be picked up and eaten out of hand. Until now! I ate two slices with no fork!! This worked spectacularly. Although it is not highly reminiscent of the yeasty risen wheat dough that causes me so much belly-grief, it is the best grain free pizza dough I have tried to date.  I look forward to making it again! (and again...and again...)

Grain Free Cauliflower Pizza Dough

1 small-medium head org. cauliflower
1 generous tbsp coconut oil
1 ½ cups almond flour
2 Tbsp arrowroot flour
1 egg
1 cup grated mozzarella cheese
4 tbsp ground Chia seeds
2 cloves minced garlic
1 tsp Herbamare

Raw Dough
Preheat oven to 425F, using a large pizza stone in the oven if you have one.
Cut cauliflower into chunks and process in your food processor until very fine. (alternatively grate on a box grater into fine crumbs)
Heat coconut oil in large pan, and sauté the processed cauliflower  over medium high heat for 6-7 minutes. (this helps to pre cook the cauliflower without adding water like steaming would)
Set aside to cool slightly.
When cool, mix in the rest of the ingredients and knead with hands until it is very well combined. 
On a large piece of parchment paper, spread “dough” into a large circle (or pizza shape of your choice!) approximately 1cm thick.
Transfer dough on parchment to a pizza peel or to a large sheet pan, and bake in preheated oven for 15 -20 minutes or until the crust is starting to brown nicely.
Cooked Dough
Top with toppings of choice**, and bake for another 8-10 minutes or until the toppings are heated thru and the cheese is melted nicely. We used an organic pizza sauce from Eden, thinly sliced mushrooms, an organic beef pepperoni, and a combo of raw milk mozzarella and parmesan cheeses.
Let cool slightly before indulging!
**go easy on any toppings that are “wet”,  as they will make your crust less crisp.


Tuesday 26 March 2013

Grain Free Banana Muffins


Somehow when transferring my recipes over from my recipe page on Facebook, this one was missed! Jim recently requested them, so I had to hunt down the recipe. Apparently it has been too long since I have made them! I have updated this recipe a bit from the one posted over there, taking out one egg, and increasing the oven temperature but decreasing the cooking time.
We don’t like overly sweet muffins, feel free to increase the honey or coconut nectar to ½ a cup if you feel like a sweeter muffin.
I think my favourite part of working with grain free "flours" is the mixing. With regular flours, you have to be careful not to over mix, for fear of releasing the gluten in the flour,(this results in a tough muffin.) With the grain free "flours" this is not an issue, just the opposite in fact. They need the extra mixing to ensure the flours and eggs are thoroughly combined.

Grain Free Banana Muffins 
1 c. almond flour (JK Gourmet is my fav, it is nice and fine)
6 Tbsp. coconut flour
3/4 tsp. baking soda
1/4 tsp. sea salt
½ c of milk, kefir or yogurt
¼  c coconut oil, melted
¼ cup honey or coconut nectar
2 bananas, very ripe!
4 eggs
2 tsp. vanilla
Optional ingredients:
1 cup chopped walnuts
OR
1 cup chocolate chips (I like the Enjoy Life brand)

Preheat oven to 375F, and prepare your muffin tin either by greasing or using non-bleached paper liners.
Put all ingredients except walnuts/chocolate chips in a large mixing bowl, combine thoroughly with immersion blender. (I am sure you could put everything into a blender and whiz till well combined, or whisk VERY vigorously if you don’t have an immersion blender)
Add walnuts or chocolate chips and stir to combine. (you can even use both, I bet it would be tasty! If you do, I would use ½ cup of each)
Scoop into muffin tin lined with papers (or greased) about 2/3 full. (Should fill 12)

Bake in preheated oven for  20-25 minutes on the center rack.
Let cool in pan for 5 min before removing from pan to a cooling rack.

Monday 25 March 2013

Roasted Orange Walnut Salmon with Rosemary


This is a bonus two-recipes- in-one post. We very often cook with pre-planned leftovers, to be used either as is, or changed up somehow to be used in our lunches for the next day.  After dinner, while we are tiding up (Jim calls me “Hurricane Janine” in the kitchen) we get our lunches ready for the next day to keep our mornings less hectic. Freezing 1 cup portions of quinoa gives a great salad filler for the extra veggies or proteins from dinner. If you freeze it spread out and flat in baggies, it thaws in no time.
I threw together this tasty salmon topping, and the pan juices become the dressing for the salad. Easy and tasty!
We served our salmon with some organic baby spinach sauted in butter, and these potatoes from my old blog. (Gluten warning: the malt vinegar mentioned in the linked recipe does contain Gluten, substitute a raw apple cider vinegar or a nice organic balsamic)

Roasted Orange Walnut Salmon with Rosemary
5 Wild caught salmon pieces or one very large piece, thawed if frozen
1/3 cup organic walnuts, finely chopped
Zest of ½ an organic orange
Juice of whole organic orange (mine was not very large)
1 T coconut nectar
2 T melted coconut oil or olive oil
1 tsp coarsely ground black pepper
1 tsp Herbamare (or sea salt of your choice)
2 sprigs fresh rosemary, woody stems removed, finely chopped (or sub 1 tsp dried)
Preheat oven to 450F. Place Salmon, skin side down,  in an oven safe dish. Set aside.
Mix all ingredients together and spread evenly on top of salmon pieces. Bake on middle rack in preheated oven for 15-20 minutes, or until the salmon flakes easily with fork and is opaque thru.
Serve hot!

Salmon Quinoa Salad:
1 piece of the above salmon, plus the extra pan juices,
1 cup of pre-cooked quinoa
 2-3 cups mixed organic baby greens
Flake the salmon in a medium mixing bowl. Add quinoa, salad greens and the pan juices from the salmon. Toss well, makes two servings.

Sunday 24 March 2013

Grain Free Saskatoon Berry Lime Muffins


 These muffins were created as a way to showcase these lovely little dried Saskatoon berries. Where does one find Dried Saskatoon berries, you may ask? Well, it is kind of a sad story, but these muffins are the result of it, so it does at least have somewhat of a happy ending. Not too long ago, our upright freezer door was left open a crack for a whole entire day, and the things that were  in the door of the freezer thawed. Some things were salvageable, some, alas, were relegated to the trash bin. I was loathe to throw out the Saskatoon berries that were still cold, but now sitting in a few inches of their juice. Organic Saskatoon berries are hard to come by, and throwing out the last of these beauties was just not happening! I ended up draining them well, and throwing  them into my dehydrator, so all was not lost! I now have a whole mason jar of these tart/sweet little yummies to use.  These muffins would be just as yummy with dried cranberries or cherries, or even  raisins (omit lime and add 1 tsp cinnamon!), I am sure finding dried Saskatoon berries, unless you are in my kitchen, could potentially be a little hard!


Grain Free Saskatoon Berry Lime Muffins

6 eggs
½ cup coconut flour
4 T coconut sugar
½ tsp salt
Juice of 1 lime
1 tsp baking soda
½ tsp baking powder
¼ cup melted coconut oil

½ cup dehydrated Saskatoon berries
Grated rind of 1 lime

Preheat oven to 400F

Place all ingredients except lime rind and Saskatoon berries together in a mixing bowl, and whiz with an immersion blender (or LOTS of elbow grease!) until very well combined.  (coconut flour tends to clump, the immersion blender is perfect for coconut flour recipes!)

One of my favourite kitchen
 tools...my rasp!
Fold in the lime rind and Saskatoon berries, mix well to incorporate evenly.
Let batter stand for 5 minutes to thicken up.
Divide evenly between greased or lined muffin tins (mine made 10) 
Bake at 400F on the middle rack for 13-15 minutes, or until a toothpick inserted in the middle comes out clean and the edges are just starting to brown.
Let cool on a wire cooling rack. Store at room temperature for the first day, after that store in the fridge for freshness.


Thursday 21 March 2013

Grain-Free Blueberry Cobbler


I arrived home from work after a stressful day, craving some good old fashioned comfort food. A nice beef curry was already planned for dinner, but that, my friends, was not enough. I just so happened to have a bunch of nice organic blueberries that were begging to be used in something decadent, like a nice blueberry cobbler. But, that poses a problem when you have taken grains and refined sugars out of your diet. So, to my trusty laptop I went, to search for a grain free version. And I found nothing resembling the type of cobbler I was craving. Every recipe I found was much more “crisp” like, not the cakey-fruity combination that my stressed out psyche was craving. (I know, food should not be a crutch, but a girls gotta do what a girls gotta do!) So, I invented this, as a balm to my soul, and it was good. Very, very good. Almost guiltless comfort food, topped with fresh whipped cream…bliss in a bowl!

Grain-Free Blueberry Cobbler

Blueberry  layer
3 cups organic blueberries, rinsed and drained
2 Tbsp arrowroot powder
3 Tbsp maple syrup
Cobbler layer
1 cup almond flour
3 T coconut flour
½ tsp baking soda
½  tsp salt
3 eggs
2 Tbsp maple syrup
¼ cup milk (or milk substitute of choice)
1 tsp vanilla

Directions:
Preheat oven to 350F
In an 8x8 glass baking dish, toss the blueberries with the arrowroot flour. Drizzle with the first amount (3 tbsp) of maple syrup. Set aside.
In a medium mixing bowl, add all of the cobbler ingredients, and mix very well with an immersion blender or lots of elbow grease and a wire whisk. Coconut flour tends to clump, be sure to mix well! Pour evenly over the blueberry mixture and bake in the preheated oven for 40-45 minutes, or until the batter starts to turn a nice golden brown, and the blueberries start to bubble near the edges.
Serve either warm or at room temperature, with fresh whipped cream. 

Wednesday 20 March 2013

Bone Broth 101, My Method!

You will notice that I refer to Bone Broth in a lot of my recipes.  Just what is bone broth, you ask? Can’t you just substitute a store bought tetra pack of chicken or beef broth, you ask? What about those fancy little foil wrapped cubes? If you are a purist like me, the answer is unequivocally no!! Even in the best organic boxes of “stock” you will find undesirable ingredients. (I am still trying to figure out why they need to add “natural beef flavour” and “caramel colour” to something so simple, and that is just the tip of the iceberg when it comes to the additives I have read on labels!) Not to mention, homemade broth just tastes better. Homemade chicken bone broth is the go to remedy in our house when anyone is feeling a little under the weather.  And it really is not hard to make. I have made my own broth for years, although the way I make it has changed in the last few years. I do still keep baggies in my freezer for the leftover poultry bones, and organic veggie peelings and trimmings (garlic, onion, celery, carrot etc.), When the baggies are full, I toss them in the crockpot. Because, hey, the only thing better than making your own nourishing broth is making it for FREE, out of what would normally be tossed in the trash!  (I should mention here, when we shop at Fenwood Farms, they offer a bag of chicken stock bones for free with every purchase) I usually buy my beef soup bones at Oakridge Acres, one package usually costs me around 3$. Two packages usually net me about 12 cups of bone broth.

Now that beef is back in our diet, beef bone broth has become a favourite of mine. I use it in soups, stews, for de-glazing pans, as a nourishing hot beverage, etc.  The process, however, changed after reading Nourishing Traditions. Bone broth contains an amazing amount of trace minerals, calcium and magnesium just to name a few. (read more about the many awesome benefits HERE) Like I said, I am a purist though, and prefer to keep my stock simple, using just the grass fed beef soup bones, and not the vegetables like some use. Completely a matter of choice though! (I do sometimes add the veggies to my chicken broth, but it does change the flavour) To make chicken bone broth, simply substitute chicken bones for the beef bones, the method is essentially the same.

My Method:

For this you will need a large slow cooker, and depending on the size, a package or two of beef soup bones and some raw organic apple cider vinegar (this helps release the nutrients from the bones). I usually try and have my large crock pot about half full of bones.
  • Place bones into crock pot 
  • Top up your crock pot with water  
  • Add a few TBSP of a raw organic apple cider vinegar 
  • Turn on to low, cover and leave it for at least 24 hours (up to 30 ish max)
  • At the 8 or 9 hour mark, if the bones are particularly meaty, I will pull them out, remove the meaty parts, and throw the bones back into the crock pot to continue cooking. This meat can then be used as part of another meal, making the broth even more frugal 
  • At the end of the cooking time, remove the larger bones, and strain the broth thru a fine mesh strainer to remove any small bone fragments  
  • Chill the stock until it gels and the fat solidifies  
  • Remove the fat layer from the top  
  • Use the broth either right away, or freeze in your choice of serving sizes. I like freezing about 2 cups in the medium plastic freezer bags, I label them with a magic marker so I can tell which kind of stock it is. You can use mason jars**, empty yogurt containers, or whatever you wish that will freeze well.  (**if using mason jars be sure to leave room in your jar, as the broth will expand when freezing, and can potentially break the jar)
I like to keep a good supply of bone broth on hand in the freezer, so it is always ready when you need it. 

Ready to go!
After 24 hours
Strain before cooling
Meat pulled off after
8 hrs cooking
skim the fat before freezing
pour cooled broth into baggies
to freeze.

Tuesday 19 March 2013

Potato Kale Soup


This recipe was born out of a need to use up a bag of frozen Kale (the last bag left from my garden in the fall, boo!) that had inadvertently thawed when the freezer door was left slightly ajar for a day (Luckily only the things in the door thawed, I did manage to salvage a bit, thank goodness!) The combo of kale and potatoes makes a hearty enough soup for any meal. This could easily be made vegetarian by using a veggie broth in place of the beef.

Potato Kale Soup

2 T coconut oil
1 med-lg onion, chopped
2-3 cups of chopped yellow potatoes (I think I had about 8 smallish ones)
3 cloves of garlic, roughly chopped
2 large carrots, chopped
4 cups broth of choice, (I used some frozen beef bone broth)
2-3 cups chopped Kale (mine was frozen and then defrosted, you could also use fresh, just sauté it with the onion and potato at the beginning)
Salt and pepper to taste

Heat the coconut oil in a large stock pot over medium high heat until melted. Add the onion and sauté for 3 min. Add the chopped potatoes, carrots  and garlic (and fresh kale if not using frozen) and sauté until everything starts to brown slightly, or about 6-8 minutes.
Add broth to the pot and scrape the bottom with a spatula to release all of the nice brown bits. Add frozen kale , and salt and pepper to taste. Bring to a boil, then reduce heat, cover and simmer for 15-20 minutes until all of the veggies are tender.
At this point, you can serve the soup as is, or puree to the consistency you desire with an immersion blender. I  pureed about half of it, so it is still just slightly chunky. This way the potatoes add a thick creaminess to the broth without adding any dairy. (that being said, I think this soup would be lovely with a swirl of sour cream or crème fraiche added just before serving!)

Thursday 14 March 2013

Grain Free Orange Coconut Chocolate Chip Muffins


I had my doubts about these muffins during the whole invention process.  The batter was thicker than I would have liked, I ended up adding a lot more liquid to loosen it up. And then, they took quite a while to bake.  I had actually written them off before they had finished baking, silly me!! They redeemed themselves when they finally finished baking though. Very tasty, and they also have a pretty amazing texture for being made with all coconut flour. Definitely a keeper recipe!
An immersion blender (or stick blender) is almost mandatory for recipes like this with coconut flour, as it tends to clump. It also adds a great frothiness to the eggs, which helps with the texture of the muffin as well.

Grain Free Orange Coconut Chocolate Chip Muffins

1 cup coconut flour
1 tsp baking soda
½ tsp salt
Grated rind from 1 organic orange
3 tbsp freshly squeezed juice from the orange
1/3 cup coconut sugar
6 eggs, (preferrably organic pastured)
1 cup of kefir or yogurt
¼ cup melted coconut oil

Mix all ingredients listed above together with an immersion blender  until very well mixed and incorporated. Mix in:

½ cup chocolate chips
½ cup shredded unsweetened coconut

Let batter stand for 5 minutes to thicken up.

Spoon into 12 muffin tins lined with papers or well greased.
Bake 20-25 min at 350F or until toothpick comes out dry and the muffins are just starting to brown nicely on the top.
Remove from muffin tin and let cool before eating (trust me, the chocolate chips are HOT!)

Wednesday 13 March 2013

Veggie Egg Muffins


A speedy and  adaptable protein to serve with breakfast, lunch or dinner! Change the veggies and cheese to what you have on hand, adding some crumbled bacon or chicken would be good too. Sautéing the veggies first releases some of the moisture, and ups the flavour factor!


Veggie Egg Muffins

½ cup red onion, diced
2 mushrooms, chopped
1 clove garlic, minced
2 tsp butter, plus more for greasing muffin tins
 1 ½ cups spinach, chopped
6 eggs
Pinch of red pepper flakes
½ tsp salt
1 scant cup of grated cheese

Grease 6 muffin tins generously with butter and preheat oven to 375F
Sauté the onion, garlic and mushrooms until they are starting to just lose their moisture and brown up a bit, about 3-4 minutes. Divide the mixture between the 6 greased muffin tins and set aside.
Chop the spinach and add some to each muffin tin, again  set aside.
Beat eggs, salt and hot pepper flakes well with an immersion blender or whisk (immersion blender works well at adding lots of volume to the eggs) Divide egg mixture evenly in the 6 muffin tins, and top with the grated cheese.
Bake for approx. 20 minutes in preheated oven, or until  set in the middle, puffy and starting to turn a nice golden brown colour.

They will be nice and fluffy when you first take them out of the oven, but will fall slightly as they cool. Can be served hot, at room temp or chilled. Great for lunch boxes!

Tuesday 12 March 2013

Janine’s Breakfast Shake


I must confess, Jim usually makes our shakes in the morning. But I slept in today, and he was already off to work by the time I got up. Being as I often get asked what is in my shake, I figured it was a great day for this post, as I had to make it myself! Our shakes are a nutritional powerhouse to start our day, the energy they provide is amazing. That being said, this shake may not be for everyone, to say the least. We have tweaked it a lot over the years, and our taste buds have changed with it. You will notice there are  no added sweeteners, and there is no fruit at all, so it is not sweet in the least. We also like to choose natural protein sources over the processed protein powders, as we find them much easier to digest. Food in its purest form is always our first choice for bio-availability of vitamins, minerals and nutrients.  We sprout on a continual basis, and have an awesome garden full of greens to pull from during the spring, summer and fall. (I really miss my garden during the winter months...I am already pouring over my seed catalogue for the spring planting season!!)


The basis of the shake is always the same. The add in’s change according to what we have sprouting on the counter at the time, what is in the garden, and what Superfood powders we have in the cupboard. I will list in 3 categories, and link ingredients where possible for more info on why we choose them.

Basic Shake Base:
1.       ¾ cup kefir  (we make our own)
2.       2 raw eggs (pastured, from a farm you trust!)
3.       1 tbsp hemp seeds
4.       1 tbsp Chia seeds (ground or whole, black or white, doesn't matter! we switch back and forth)

Greens:
I think it is prettier before it is blended!
  1. 1/3-1/2 cup of fresh sprouts (alfalfa, red clover, and mung beans are our faves, sometimes we do broccoli too)
  2. 1/3-1/2 cup fresh greens (spinach, kale, dandelion, lettuce) OR a serving of a greens powder if we have nothing fresh, but fresh is always preferable!)
Superfoods: (we don’t use all of these all of the time, the first three are pretty much always used, the rest we alternate and switch up quite often, each one adds a different profile of nutrients, as well as taste!)

  1. 1 tbsp coconut oil melted
  2.  2 tsp raw cacao powder
  3. 1 tsp maca powder
  4.  ½-1 tsp chlorella powder
  5. ½ -1 tsp Spirulina powder
  6. ½-1 tsp moringa powder
  7.  ½ tsp gotu kola powder
  8. 1 tsp ashwaganda powder
  9.  Bee pollen granules (anywhere from a few granules up to a tsp)
We use the single blender –style shake cups, so if we want different ingredients, we can customize each cup. Enjoy, and let me know if anyone is brave enough to try it!

Sunday 10 March 2013

Quinoa, Chicken and Veggie Salad with Applewood Smoked Cheddar


Adding the quinoa to this salad while it is hot melts the smoked cheddar so it becomes part of the dressing to this salad. This cheese has a strong smoky flavour, so a little goes a long way.

Quinoa Chicken and Veggie Salad with Applewood Smoked Cheddar

1 cup cooked chicken, cubed
1 carrot, shredded or grated
2 stalks celery, chopped
½ cup broccoli, chopped
¼ cup grated Applewood smoked cheddar
1 apple
½ lemon, juiced (or 2 tbsp)
3 tbsp olive oil
2 tsp grainy mustard
½ tsp Herbamare (or other salt)
1 cup HOT quinoa

In a medium mixing bowl, mix together the chicken, carrots, celery and broccoli. Set aside.

Core and chop one apple and place in a small bowl. Squeeze the juice of ½ of a lemon over the apple and toss. Remove the apple pieces, leaving the lemon juice in the bowl. 

Toss the apple with the chicken and veggies, and again set aside.

To the lemon juice, add the olive oil, mustard and salt. Whisk well to combine.

Add cheese and the dressing to the veggie chicken mixture and toss to coat.

Add the Hot quinoa and stir well to combine.

Chill before serving.

Saturday 9 March 2013

Quinoa Cakes


I love quinoa.  (pronounced : KEEN-wah) This wonderful little super-food packs a big nutritional punch, giving you protein, iron, fiber  magnesium and potassium, just to name some of its benefits. It is naturally gluten free, and it is technically a seed, not a grain. But it behaves in a very grain-like manner, making it a very versatile ingredient to add to your cooking repertoire. It is a great addition to salads, soups, and casserole type dishes alike. A friend of mine recently made a lasagna with it that I am itching to make!
This recipe is just one of my favourite ways to prepare it. Feel free to change up the veggies, and the cheese to suit your taste-buds or what is in your fridge. The possibilities are endless! They are great eaten warm or cold, and freeze well. Tuck them into your lunch bag with a side salad for an energizing mid-day meal. However you eat them, I am sure you will love them!

QUINOA CAKES
1 cup quinoa, well rinsed
2 cups water
1 cup finely chopped or shredded carrots
2 tbsp finely chopped shallot (onion would do as well!)
Fresh /dried herbs of choice (used dried parsley and thyme in first batch) use slightly more fresh than dried
3 eggs
1 cup grated cheese of choice (used Romano and goats milk mozzarella )
1 tsp salt
½ - 1 tsp Hot red pepper flakes (optional)
1 tbsp arrowroot starch

Bring water and quinoa to a boil, reduce heat , cover with lid, and cook for 15 min. Turn off heat, let sit for additional 5 min. Set aside to cool.
When quinoa is cool enough to work with, mix with rest of ingredients, and pack into greased muffin tins. (I used the bottom of a drinking glass to make the tops flat and compress the cakes nicely)
Bake at 350F for 30 min. Run knife around edges, let sit in pan for 5 min, then gently lift out. Serve warm or cold.

Friday 8 March 2013

Chocolate Espresso Almond Power Balls


Chocolate Espresso Almond Power Balls 

1 ½ cups raw almonds
1/3 cup raw cacao powder
2 tsp finely ground organic espresso
9 medjool  dates, pitted
2 tsp vanilla extract
½ tsp Chlorella or Spirulina powder (optional)
2 -4 tbsp raw honey


In food processor, grind almonds with cacao and espresso until very fine. Add pitted dates and pulse will very well combined. Pulse while adding vanilla, Spirulina/chlorella powder and just enough honey to make it start clumping together (this step may take a bit of pulsing to make it all come together)
Remove “dough” from processor bowl and roll into balls…mine made about 20 bite sized ones. 
Store in refrigerator. Enjoy!

Grain Free Coffee cake muffins


Tasty weekend breakfast: Grain free coffee cake muffin, 1/2 of an organic grapefruit, and a glass of kefir, with cinnamon sprinkled on top. Yum!

Grain Free Coffee Cake Muffins 
1 c. almond flour
6 Tbsp. coconut flour
3/4 tsp. baking soda
1/4 tsp. sea salt
½ c of kefir, yogurt, or milk of choice
¼  c coconut oil, melted
¼  c. honey
4 eggs
2 tsp. vanilla


Put all ingredients in a bowl,  Combine thoroughly with immersion blender. Let stand 5 minutes. (I am sure you could put it all into a blender and whiz till well combined)
Scoop into muffin tin lined with papers (or greased) about 2/3 full. (Should fill 12)

Then make the cinnamon topping:
3 Tbsp. honey
2 tbsp coconut oil
1 Tbsp. cinnamon
¾ cup chopped walnuts

Drop approx 1 tsp on top of each muffin.
Bake at 350 degrees for 15-20 minutes.
Let cool in pan for 5 min before removing to cooling rack.

BBQ Braised Cabbage


I had a really nice head of organic cabbage that had been hanging out in my fridge for a couple of weeks, just waiting for some inspiration. I was thinking of making another batch of sauerkraut with it, being as my supply is starting to run low, but just hadn't gotten around to it yet. I was also thinking of making my favourite  spicy cabbage from a post on my old blog (http://9cooks.blogspot.ca/2010/01/will-trade-for-duck-eggs.html), but again, it just hadn't happened yet. So there the cabbage sat.  On Saturday Jim and I had picked up some Steam Whistle Spicy Beef Sausage With Beer at a really cool place in Kitchener: (http://www.fiddleheadshealth.com/retailer/store_templates/shell_id_1.asp?storeID=6CDFC10EFEFF4F04BA13BEC66142CE79) I knew I was going to BBQ them tonite, and on a whim decided to BBQ the cabbage too. Why not, right? I threw it in a double layer of foil, heated up the grill, and found a brand new favourite way to have cabbage.  This will be repeated OFTEN! The cabbage takes on a smoky buttery sweetness that is amazing. It was the perfect side to our sausages.

BBQ Braised Cabbage

½ of an organic Cabbage, cut into 4 wedges.
4 pats of butter
Salt and pepper to taste
8 pieces of foil, big enough to wrap around the wedges, you will use 2 pieces for each wedge


Directions:
Preheat BBQ.
Place a wedge of cabbage on 2 pieces of foil , top with a pat of butter , and salt and pepper to taste.
Wrap foil up around cabbage well, and repeat with the other 3 wedges.
I used the indirect BBQ method, turning off the middle burner on our BBQ  but leaving the outer 2 on medium heat. 
Close lid and leave for 35-40 minutes. Unwrap carefully and enjoy!

Shepherds Chicken Mock Pie


Another oldie, it definitely deserves a place on the new blog!
I started out making shepherd’s pie one night for supper. But, I wanted to substitute mashed cauliflower for the typical potato layer. And I wanted to substitute chicken for the typical beef, being as we had leftovers from the chickens that we rotisseried on the weekend.  When all was said and done though, the chicken layer turned out more like a chicken pot pie filling. Hence the funky name. But it was very tasty. The boys said we needed to have it more often. So, I am sharing my invention, I hope you like it, I know we did!!

Shepherds Chicken Mock Pie

Ingredients:
I medium head cauliflower, chopped
½ cup cottage cheese (I like the Weston Brand pressed cottage cheese, very good ingredients!!)
Salt and pepper to taste

3 tbsp coconut oil
1 onion, diced
½ cup carrots, diced
½ cup celery, diced
2 cloves garlic, minced
¾ tsp dried thyme

2 cups diced precooked chicken
1 ½ tbsp arrowroot starch
1 ½ cups chicken broth

1 cup (not packed, just loose) grated cheddar cheese

Directions:
Steam the cauliflower until soft, 10-12 minutes (approx!!)
Drain and puree or mash very well, you are aiming for a mashed potato consistency. Add the cottage cheese, and season with salt and pepper.  Mix well, and set aside.

In large sauté pan, sauté the onion, carrots, celery, garlic and thyme in the coconut oil, until softened and starting to brown, 8-10 minutes(ish)
Add the diced chicken and stir to incorporate.
Sprinkle the arrowroot over the chicken/veg mixture to combine.
Add chicken stock, and stir till thickened, just a few minutes.
Divide the mixture evenly between 4 oven safe dishes (or a single 6-8 cup baking dish).
Top with the cauliflower mixture, and then top with the grated cheddar. (At this point it can be refrigerated up to a day, and baked later on, just add 15-20 minutes to the baking time below)
Bake at 375F for 30-35 minutes or until bubbly and cheese is melted on top. 

Chicken, Sage and Apple Sausage Patties


This is an older recipe from my Facebook recipe page, one that I almost forgot about. These were very tasty, and need to be made again I think!

Chicken, Sage and Apple Sausage Patties

2 lbs organic free range ground chicken
½ cup finely chopped onion
1 granny smith apple, peeled, cored and grated
2 cloves minced garlic
2 tbsp finely chopped sage
2 tbsp finely chopped garlic chives
1 ½ tsp sea salt
½  tsp freshly ground black pepper
Coconut oil for frying 

Combine all ingredients in a medium sized bowl until well mixed. (hands work well for this!)
Shape into 2 inch balls, and squish into patties, about ½ inch thick.
Heat coconut oil in  large skillet over medium high heat.  Cook patties in batches, 2-3 min per side, or until nicely browned and cooked thru, adding more coconut oil if needed. 

Serve hot with a side of eggs!

Thursday 7 March 2013

Cream Cheese Chicken Roll-Ups


Days off in my world almost always involve time spent in my kitchen and today was no different. I had some skinless boneless thighs that were screaming for a special recipe. Add spinach and cream cheese, and these beauties were born. This is pretty enough to serve to company, and pretty darn easy to throw together for dinner on a weeknight. I pounded my chicken (well, Jim did the actual pounding…) on a baking sheet under parchment paper. You will want it fairly thin, but evenly pounded to make rolling easy. 


Cream Cheese Chicken Roll-Ups

8 skinless boneless chicken thighs, pounded thin
1 tbsp butter
1 medium onion, finely chopped
2 cloves garlic, minced
1 ½ cups finely chopped mushroom
4 cups chopped spinach
Salt and pepper to taste
1 cup organic cream cheese
2 cups of chunky tomato sauce
¼ cup freshly grated Parmesan cheese

Sauté onion mushroom and garlic in pan with the butter until they start to soften and brown a bit. Add spinach, stir in, and turn off the heat. Season with salt and pepper. Add cream cheese and stir to combine.  Let cool slightly.
Divide mixture evenly between the 8 pounded chicken thighs and spread along the whole length , and roll up like you would a cinnamon roll. Place rolls carefully in a 9x13 baking dish. Cover with tomato sauce, and bake, uncovered at 400F for 45 minutes or until cooked thru.  Serve along with sautéed zucchini noodles.

For Zucchini Noodles:

2 small to medium sized zucchinis
1 tsp salt
1 tbsp butter or coconut oil, mixed with one clove of minced garlic

Prepare your zucchini noodles while the chicken is in the oven.  I use my very cool spiral slicer to slice the zucchini. (a mandolin, or julienne peeler will make the “noodles” as well) 
Place the spiraled zucchini on a few layers of paper towel. Sprinkle with salt, and let sit for about 1/2 hour, to “sweat” (the salt helps it release excess moisture). Place a few more layers of paper towel over top and then roll up (again, like a cinnamon roll) and squeeze gently to absorb the released moisture.  Sauté the noodles in  a nice hot pan with some coconut oil or garlic butter until hot and sizzling, about 5 minutes.  Top with pan juices from the chicken, and a sprinkle of freshly grated Parmesan.