This blog is all about Food. Real Food. Food that Nourishes, Heart and Soul.

Real Ingredients, Organic and Locally sourced whenever and where ever possible, shared with love.

No packages, no ingredients that are impossible to pronounce.

Real, honest food, from my kitchen to yours. Enjoy!

Tuesday 28 May 2013

Herby French Style Dressing


We are having a very slow start to spring here, but my herbs are coming along nicely. They are usually the first green thing that we can eat from the garden, and I use them all thru the growing season. This dressing needed some perking up, and the handful of herbs from the garden was perfect. I used chives, garlic chives and thyme here, just be sure to remove any tough stems before chopping. You could substitute any other fresh herb that you like, basil and oregano would be lovely!

Herby French Style Dressing

½ cup olive oil
½ cup apple cider vinegar (one that is raw and unpasteurized, with the “mother” like Filsingers or Braggs)
2 T Hemp Oil (optional, see the benefits of hemp oil here)
2 tsp paprika
2 tsp coconut sugar
1 tsp Herbamare
¼ tsp fresh ground black pepper
Juice of ½ organic lemon
4-5 tbsp fresh herbs, finely chopped

Pictured in a patio  pot of salad greens 


Measure all ingredients into a two cup mason jar. Shake well to combine. Serve over greens of choice.  Keeps in the fridge for 3-4 days.

Saturday 18 May 2013

Grain Free Gingerbread Apple Muffins


First of all, as much as these look like chocolate muffins, they aren't  (even if my hubbie thinks they taste like chocolate, which I still don’t understand, but we will move on!) I intended to make banana muffins this afternoon, but ended up making a banana oat chocolate chip bar to go in the freezer for my boys with the bananas instead. Being as the muffins were supposed to be for tomorrows Breakie, I still needed to come up with a recipe.   Being a bit cool today, a nice spicy gingerbread sounded yummy. I think they will go perfectly with a grapefruit and a nice cup of green tea in the morning. I used my kitchen rasp to finely grate both the ginger and the nutmeg. If you don’t have a rasp, or the fresh ginger and nutmeg, substitute the dried spices. I peeled my apple, even though it was organic it still had a waxy feel to it, but it is not generally necessary. 

Grain Free Gingerbread Apple Muffins

1 ½ cups almond flour
¼  cup coconut flour
¾ tsp salt
1 tsp baking powder
1 tsp cinnamon
Pinch of allspice
¼ cup coconut sugar
1/4 cup coconut oil
3 eggs
¼ cup molasses
1 tsp grated fresh ginger (or ½ tsp dried)
Pinch of Grated whole nutmeg (or scant 1/8 tsp dried)
¼ cup kefir or yogurt
1 cup grated organic
granny smith apple

Mix all ingredients  except grated apple together in a large mixing bowl with a stick blender until well combined. Mix in grated apple and combine well.
Scoop evenly into 12 lined muffin tins.
Bake for  20 min, or until a toothpick inserted in the middle of a muffin comes out clean.
Remove from oven and let stand in muffin tin for 5 minutes. Remove from pan and cool on wire rack.
Enjoy!

Tuesday 14 May 2013

Moroccan Chicken and Lentil Soup


These last few days of cold spring weather have left me craving soup. Salads on a cold day just don’t seem to warm your insides the way a nice bowl of soup does.  I had a big bowl of bone broth waiting to be bagged for the freezer, so I decided to make some soup for our lunch tomorrow with some of it. These spices are used together in a rub that we love on chicken. ( I think that recipe came from one of those old smaller sized  Chatelaine type recipe magazines that you see in the grocery store check outs?) We have used it here forever, and had it on some drumsticks on the grill this past week.  I thought these warming flavours would go really well in a soup, and my intuition was bang on. The lime definitely makes it...although it is not the first thing you taste, it pulls all of the flavours together beautifully.
I added the cooked lentils at the end, they were kind of a last minute inspiration, but they seemed to compliment the Moroccan vibe going on in the soup pot. I imagine you could add them dry when you add the stock and water to the soup and cook them at the same time, as they generally take about 20 minutes to cook on their own .

You can easily convert this soup for vegetarians by using veggie broth  and leaving out the chicken.

Moroccan Chicken and Lentil Soup

1 tbsp coconut oil
1 onion, chopped
1 ½ cups chopped carrots
2 cups purple cabbage roughly chopped
2 cloves garlic, minced
1 tsp salt
1 tsp cinnamon
1 tsp cumin powder
1 tsp curry powder
1 tsp allspice
4 cups chicken bone-broth
1 cup water
Juice of 1 lime
1 cup pre-cooked chicken
1 cup pre-cooked lentils**

Sauté the onion in the coconut oil over medium high heat for 3-4 minutes. Add the carrots, cabbage and garlic. Continue to sauté for 8-10 minutes, stirring often, until the veggies are getting some nice brown colour. Stir in the cinnamon, cumin curry and allspice and sauté for another minute.  Add the chicken broth, salt and water, and the juice of the lime. Simmer covered for about 20 minutes. Add the chicken and the lentils and simmer another 8 minutes, until everything is nice and soft and fragrant.
  Serve hot!

**To cook lentils on their own, rinse 1 cup of dried lentils, pick out any debris or stones. Place in a pot with 3 cups of water. Bring to a boil and reduce right away to a simmer. DO NOT ADD SALT until they are cooked! Cook  for about 20 minutes or until they are just softened. Drain any extra liquid, and use as desired.

Friday 10 May 2013

Kafir Lime Custard with Blood Orange Compote

I bought a bag of blood oranges at work a few weeks back, intending to create something yummy with them. But, then I was totally distracted with planning my cooking class, and the poor little beauties have been languishing in my fridge ever since.  Knowing I would be off today, and wanting to create something decadent yet somewhat healthy to serve my Mother-in-law for dinner tomorrow night for Mother’s Day Dinner, I started looking for a recipe that would showcase their loveliness. Nothing had all of the components I was looking for, so I had to get creative. (Just to show you how my brain works when deciding what to cook, the combination of this recipe, this recipe and this recipe led to the creation of my recipe...crazy but true) I think they turned out divine.
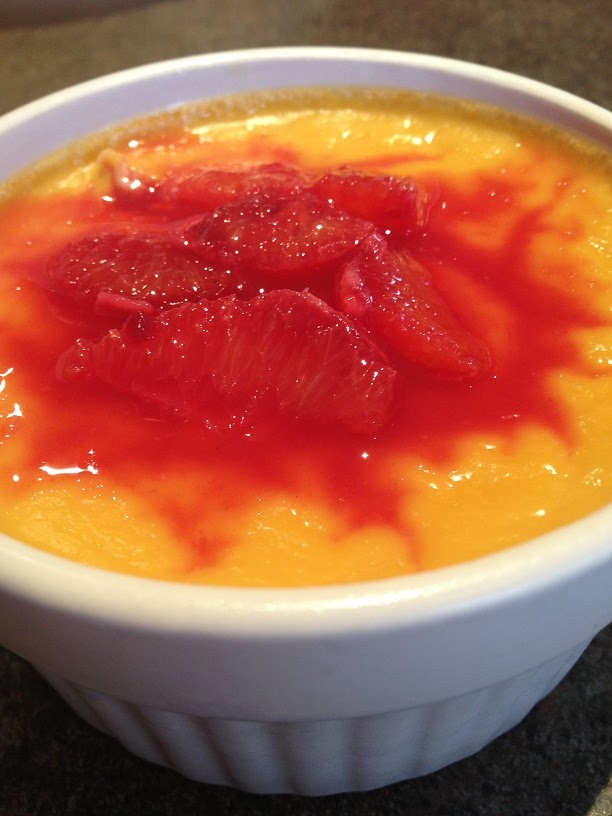
The blood orange compote, as simple as it is, is a wee bit messy and fiddly to make, but it is totally worth the effort. If you cannot get blood oranges, any other macerated fresh fruit would be lovely on top of this custard...I can see blueberries or raspberries as a wonderful substitution!
I am loving the coconut nectar lately, it adds a lovely flavour that marries so well with the kafir lime in this recipe! Feel free to substitute it for your sweetener of choice.

Kafir Lime Custard with Blood Orange Compote

Custard:
4 cups whole milk
½ cup coconut nectar (or other sweetener of choice)
6 kafir lime leaves
8 eggs, well beaten but not frothy
Pinch of salt
Compote:
6-8 blood oranges, depending on size, mine were small!
1 tbsp coconut nectar
Garnish:
¼ cup toasted coconut flakes

To make your custards:
Preheat the oven to 300F with the rack in the middle.

In a medium sized pot, combine the milk, first amount of coconut nectar and the kafir lime leaves. Warm slowly over medium heat, stirring often, until it just boils. Reduce heat to a simmer, cover and leave for 20 minutes to infuse the milk with the lime leaves.

Meanwhile, beat the eggs in a large mixing bowl until well mixed, but not frothy.

When milk is infused, stir in a pinch of salt, and remove the lime leaves.

Scoop out a cup of the warm milk, and add it slowly to the beaten eggs, stirring constantly. (this will temper your eggs so that they don’t cook when you add the rest of the hot milk) \

Add this mixture to rest of the warm milk in the pot. Stir well, and then pour thru a mesh strainer over your mixing bowl. This will remove any bits of cooked egg or lime leaves, and give you a smoother custard.
Place 9 ramekins in a large shallow pan. Fill each with approx ¾ cup of your custard mixture.  (adjust to the size of your ramekins if they are smaller or larger than mine!)

Carefully transfer your pan into your preheated oven.

Fill a 4 cup vessel that pours well with very hot tap water. (a kettle works well too!)
Pour carefully into your shallow dish to surround the ramekins. The water should come up the sides of the ramekins about ¾ of the way.

Bake for approximately 1 1/4 hours , or until they set.  If you insert a knife into the custard halfway between the middle and the edge, it should come out clean when they are cooked.

Remove them from the water bath and let cool for a good half hour, then refrigerate for at least 4 hours or up to 24. Wait until they are completely cool to cover them if you will be keeping them refrigerated for the 24 hrs.

To Make your compote:
Cut the top and bottom ends from your blood oranges to create a flat end on each. Cut the pith and peel away with a sharp knife (my serrated steak knife worked beautifully) being careful to not waste too much of the fruit on the peel.

Over a bowl, so that you can catch every drop of the delicious juice, cut the sections carefully away from the membranes. Place the membranes in a mesh sieve, you will press them at the end to get every last bit of juice. Continue with all of your oranges, and press the remaining “waste” thru your sieve into the bowl. Add the second amount of coconut nectar, and stir to combine. My oranges were pretty tiny, and I ended up with just over ½ a cup of juice and sections.


Just prior to serving, top each custard with a Tbsp of the compote, and garnish with the toasted coconut flakes.

Friday 3 May 2013

Grain Free Cinnamon Raisin Walnut Cookies


I was going to save this recipe for a possible grain free cooking class, but it is so darn good I couldn't wait to share! Toasting the quinoa flakes helps to loose the bitter flavour some associate with quinoa. I have used untoasted as well, and you can skip this step if you like, but the toasted version really is better! 
Soaking the raisins in the hot water and vanilla is a trick I learned years ago. It hydrates the raisins and makes them much more pleasant for "raisin haters"! Again, you can skip this step if you like, but it does add to the cookie!

Grain Free Cinnamon Raisin Walnut Cookies

½ cup raisins
½ cup boiling water
2 tsp vanilla extract
½ cup quinoa flakes
½ cup softened unsalted butter
½ cup coconut sugar
1 cup  almond flour
½ tsp baking soda
2 Tbsp coconut flour
1 ½ tsp cinnamon
½ tsp salt (omit if your butter is salted)
½ tsp vanilla powder (or 1 tsp vanilla extract)
2 Tbsp of the raisin soaking water
1/2 cup chopped walnuts

Preheat your oven to 350F

In a cast iron pan, toast the quinoa flakes over medium heat, stirring constantly until the flakes become fragrant, and are just starting to turn a slight golden colour. This will only take a few minutes, and they will burn quite easily, so you will need to pay attention! Remove to a plate to cool.

In a heat proof measuring cup or bowl, soak the raisins in the boiling water and the first amount of vanilla for 15 minutes. You will need to save some of the soaking liquid, for the cookies, so don’t drain it too soon!

In a large mixing bowl, cream the butter and the coconut sugar until really well combined. Add the rest of your dry  ingredients, and mix well, adding  the 2 Tbsp of the raisin soaking water as well. Drain and discard the rest of the liquid from the raisins, and then stir them into the cookie dough with the walnuts.
Scoop out onto parchment lined pan in about 1 tbsp spoonfuls. Mine made approx 18 2-bite cookies.
Bake for 12 -13 minutes  or until edges are just starting to brown for a chewy cookie, leave in up to an extra 2 minutes for a crispier cookie, but watch closely for the last 2 minutes  as they will burn quickly.

Let cool  on the pan for 10 minutes before removing to a coloring rack. They will be slightly crumbly, but will set up when cool.

Raisin-less batch for Mac, who says
they ruin the cookie :(

Raisin batch for everyone else!

I find these cookies are best the day they are made. Store in the fridge for best results after the first day. I like to freeze the rest in serving sized baggies for an easy snack on the run.